All right! I've received countless requests for a wig tutorial. So here it is...
A step by step picture tutorial illustrating how I create my wigs.
Now I'm no expert. But I make wigs for myself. They stay on my head
and get the darn job done! Lol, so if you'd like to learn how to create one for yourself,
keep reading. :)
What You'll Need :
A little stand.
A mannequin head or the equivalent.
Measure tape, wig cap, thread, scissors, needle(s), pins.
Step 1 : Using a measuring tape, measure the circumference of your head. Also,
measure the distance from one ear to the other.
Step 2 : Place your wig cap on the mannequin according to your measurements. Use
your pins to secure it.
Step 3 : Grab your hair. Admire it. Now get to work! I always sew my closures.
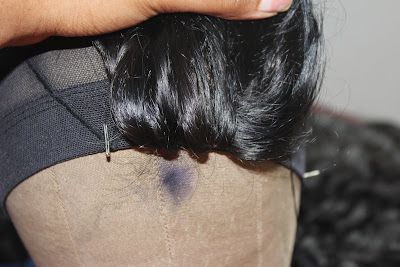
The silk of my closure is only in the center, so I'll be sewing it on to my wig
cap slightly off centered. Ya'll know I need my swoop!
Step 4 : I pull my closure taut and use a pin in the front and the back to secure it.
Pulling your closure taut is VERY important. You don't want any
bumps and grooves in your wig.
Step 5 : Time to start sewing! I start sewing my closure on the side.
Then I work my way around the back, and finally come to the front.
All the while pulling my closure taut.
Step 6 : Once you've finished sewing, ensure that your closure is
down for the long haul! Nobody wants a flapping closure! Lol.
Check the front!
Check the sides!
Now on to the good stuff!
Here is the hair that I used. Arjuni Wavy C!
A close up shot of our wefts.
Arjuni wefts usually come with extra threading on the ends.
It's okay to cut them off. These wefts are made of steel.
So you won't have to worry about shedding.
Step 7 : Select a starting position for your first piece.
My starting position varies from wig to wig.
Sometimes I start in the very back. However, this time
I started further up on the right side.
Step 8 : Start sewing! For a secure hold, I always sew in between the thread.
And I add a knot whenever I start on a new weft.
A close up look at my stitch work. Nothing special lol.
Step 9 : I rarely cut my wefts. I typically fold them over.
It's important to get the weft as flat as possible when folding it.
Secure the position with a couple of knots.
Step 10 : Bring the weft back in the opposite direction and sew it down.
You can either bring it further up to the front. Or...
...you can fold it back at the same place where the previous weft stopped.
I did the former.
Done with the first weft!
Second weft...check!
It's a bit lopsided because I installed my closure to the side.
This was the first time that I cut the weft.
I added it in the center to help with coverage.
Step 11 : As you move closer to the front, I'd recommend curving
the weft upward a bit. This will help with blending if you
plan to leave hair out.
Keep sewing and sewing...
...until you reach the tip of the closure.
Step 12 : Go back in and fill in any gaps that you see.
And that's all folks!
Now you can sit back and admire your work!
Brushed the hair out a bit.
This luster is a thing of beauty!
A close up shot of the ends. Nice and full!
Back shot! I ended up trimming off an inch or two.
I'll return with more pics of the wig on my head.
I just have to find the right tools to handle this luster lol.
I hope you all enjoy this tutorial.
If you have any questions, comments or concerns, please
drop them down below!


Thank you soo very much for this please where do you get the closures ? thank you too much :)
ReplyDeleteYeah where in the world can I purchase a closer like that....(any website in mind)?
ReplyDeletehey what type of cap did you use create this wig i love it onye
ReplyDeleteTHANKS LADIES! Please direct closure questions to : onye317@gmail.com.
ReplyDeleteNatalie : I use a mesh swim cap :)
Where did you purchase your mannequin head? Any website you can recommend. That's the perfect head.
ReplyDeleteNice post.
ReplyDeletegoogle.com
Wigs are one of the great ways for new hair style and you shared very nice thing about hair wigs. You can select from a large variety of human natural hair wigs and heat resistant synthetic fibre wigs for men and ladies on Wigs Toronto.
ReplyDelete